Difference between revisions of "Map Options menu"
Jump to navigation
Jump to search
| Line 11: | Line 11: | ||
according to the weather conditions (VMC/IMC) on the map. | according to the weather conditions (VMC/IMC) on the map. | ||
Internet connection is needed to use this feature. | Internet connection is needed to use this feature. | ||
| + | ---- | ||
| + | ==='''The «Maps settings» module'''=== | ||
| + | |||
| + | * '''Airspaces.''' Displays a list where you can show/hide the airspaces according to their type on the moving map. Use it as a filter of which type of airspaces you’d like to always see on the map and which ones not. There`s also an Altitude filter, so you might choose from seeing all the existing airspaces in the zone you are flying or just the ones at your current altitude. | ||
| + | Besides, you can fully-shade the airspaces and even display their names and show them in the Elevation Graph as shown on the screenshots, below. | ||
| + | |||
| + | [[File:terrain.jpg]] | ||
Revision as of 16:59, 18 August 2015
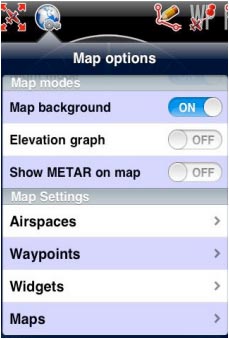
From the «Toolbar» press the «Map Options» button to access various options for the moving map:

- Brightness. Controls the brightness of the screen.
- Show maps. Enables or disables the screen background.
- Elevation graph. Enables or disables the terrain elevation
view.
- Terrain awareness 2D/3D. Enables or disables the terrain
awareness for both moving map and 3D EFIS module.
- Show METAR on map. Displays icons over the Airports
according to the weather conditions (VMC/IMC) on the map. Internet connection is needed to use this feature.
The «Maps settings» module
- Airspaces. Displays a list where you can show/hide the airspaces according to their type on the moving map. Use it as a filter of which type of airspaces you’d like to always see on the map and which ones not. There`s also an Altitude filter, so you might choose from seeing all the existing airspaces in the zone you are flying or just the ones at your current altitude.
Besides, you can fully-shade the airspaces and even display their names and show them in the Elevation Graph as shown on the screenshots, below.

