Planification de route
Contents
Version Android

Par défaut, la carte est en «mode vol» ou «flight mode». Vous pouvez basculer la carte du «mode vol» au «mode édition» à n’importe quel moment afin de créer ou modifier un itinéraire en pressant le bouton «Edit» dans la barre d’outils.

Pour commencer à créer un itinéraire:
- Basculer en «mode édition», une barre rayée jaune et noire devrait apparaître en haut de la carte. Un champ de recherche va apparaître aussi en haut du module «Route».
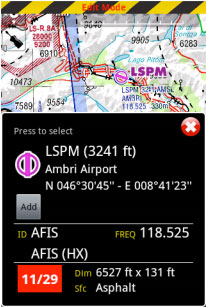
- Pour ajouter des waypoints, presser sur les points de votre choix sur la carte. Dans la fenêtre popup,

presser l’option «add». Une étoile jaune va maintenant apparaître sur la carte et votre point de navigation sera ajouté à la liste «Route».
- Alternativement vous pouvez mettre un ou plusieurs identifiants de point de navigation dans le champ de Recherche en haut du module «Route» et presser retour. Plusieurs identifiants doivent être séparés par un espace.


Dans ce mode, il est aussi possible de réorganiser et supprimer des points de la liste du module «Route». Alternativement, vous pouvez effacer un point en pressant sur la carte et choisir l’option «remove from route».
Il est possible d’insérer un point en pressant sur le vecteur magenta (leg) et en le déplaçant vers une nouvelle position sur la

carte. Un nouveau point sera alors inséré dans le module «Route». Si le lieu d’un point n’est pas trouvé
dans la base de données, un point temporaire sera créé. Vous pouvez l’ajouter plus tard à la base de données si vous le désirez.
Dans le module «Route», il est possible d’appuyer sur «Summary» afin d’écrire le nom de l’itinéraire et
la vitesse de croisière. Le nom de

l’itinéraire est utilisé pour les identifier dans le «Route list» quand
ils sont sauvegardés. L’information sur la Vitesse Croisière servira à afficher le temps estimé (ETA) dans la partie supérieure de l’écran.


Quand vous êtes satisfait de votre route, vous pouvez retourner au «Flight mode», et la route sera automatiquement enregistrée dans «la liste de Routes» (cf capture d’écran à gauche).
Sur la capture d’écran à gauche, nous pouvons observer trois itinéraires sauvegardés, à titre
d’exemple. En sélectionnant l’un d'entre eux depuis ce module, il sera pris comme l’itinéraire actuel pour Air Navigation dans la carte
défilante.

In order to Reverse the Route, you should press on the upper-right button of the «Route module» as shown on the screenshot.
You will have the options to save the current Route as a new one, send it by e-mail and also to import a GPX file as a new route.

When switching back to «Flight mode», you will show on the next waypoint of the list the bearing (BRG) and magnetic course from your current position.
iOS version
By default, the moving map is in «flight mode». You can toggle the moving map from «flight mode» to «planning mode» at any time to create or amend a route by pressing the «EDIT» button in the Toolbar.
To start creating a route:

- Toggle to «Edit mode», a yellow and black striped bar should appear at the top of the moving map. A search field will also appear on top of the «Route» module.
- To add waypoints, press on waypoints of your choice on the moving map. In the waypoint popup, press the «add to route» option. A yellow star should now appear on the moving map and your waypoint should be in the «Route» list.
- Alternatively, you can input one or more waypoint identifiers in the search field on top of the «Route» module and press return.
Multiple identifiers must be separated by a space.
Note: to find a waypoint near an airfield, typically VFR report points, you can use the following syntax: W@LSZG (waypoint id@airfield id) then return. This will force Air Navigation to find the closest waypoint from LSZG with the identifier W.
In Edit mode it is also possible to reorder and remove waypoints from the list in the «Route module». Alternatively, you can remove a waypoint by pressing on the map and choose the «remove from route» option. It is possible to insert a waypoint by pressing on the magenta vector (leg) and moving to a new location on the map. As a result a new waypoint will be inserted in the «Route». If the location on the map is not over an existing waypoint, a «temporary» waypoint will be created. You can add this waypoint later to the database if you wish to do so.
 You can create a new waypoint by pressing 2 seconds at its location on the map. A popup will ask if you want to add this point to the database or simply use it as a “temporary” waypoint for the route or direct to.

In the «Route» module, you can press on the «Summary» line at the top of the list to set the route name and wind. The route name is used to identify a particular route in the «Route» list when they are saved. Wind and cruise speed information will be used to display estimated time and heading in «edit mode». In «flight mode» current speed as reported by the GPS will be used to compute estimated time. The button at the top right corner of the window can be used to reverse the route or duplicate it. When you are satisfied with your route, you can toggle back to «flight mode», the route is automatically stored in the «Routes list».
Back to index (Android)
Back to index (iOS)
